
Welcome to my model train Blog. (2018)

Both Walthers and Heljan have the same "standard turntables" (not DCC)
that are manufactured in China.

Also both Walthers and Heljan have the same "standard turntables" (not DCC)
using (12.V-DC) motors.

Warning:
If you are using a turntable stepper motor and required circuit board technology, the sound module "can not" be "used".

ITT Products makes many different types of sound modules. (www.ittproducts.com/).
ITT Products <<< (Mouse Click To Link)
GL320-1 = Turntable 1 (Sound)
GL320-1 = Turntable 1 <<< (Mouse Click To Link)
GL320-2 = Turntable 2 (Sound)
GL320-2 = Turntable 2 <<< (Mouse Click To Link)

Special Note:
Some of the first releases of the New (GL) series (2018) have polarity (+) and (-)
marked on the circuit board for (V-DC) power input. George from ITT Products
has informed me that the (+) and (-) polarity markings can be ignored. Polarity does Not matter.

Adding A Sound Card: (Basic Procedure)
(#1)
* Basic Procedure
* Require a (12.V-DC / 1.Amp) power supply adaptor for turntable motor and sound card
* Switch (D.P.D.T.) (center off) controls:
- turntable rotation directions
- turns sound (on/off)


Speaker:
Use a 4" inch (square flanged) 8 Ohm speaker, for much better sound quality and much easier to mount facing down under the turntable. Use small stacked rubber "O" rings between the speaker flange and wooden mounting surface to prevent sound vibrations. Also mount the speaker as close as possible under the turntable, facing down. When using a single speaker, correct speaker polarity is "not" important.


Adding A Sound Card: (Advanced Procedures)
I have combined (1), (2), (3) and (4) together to have a (V-DC) turntable motor
operate much more smoother and professionally.
Caution:
This requires advanced wiring skills.

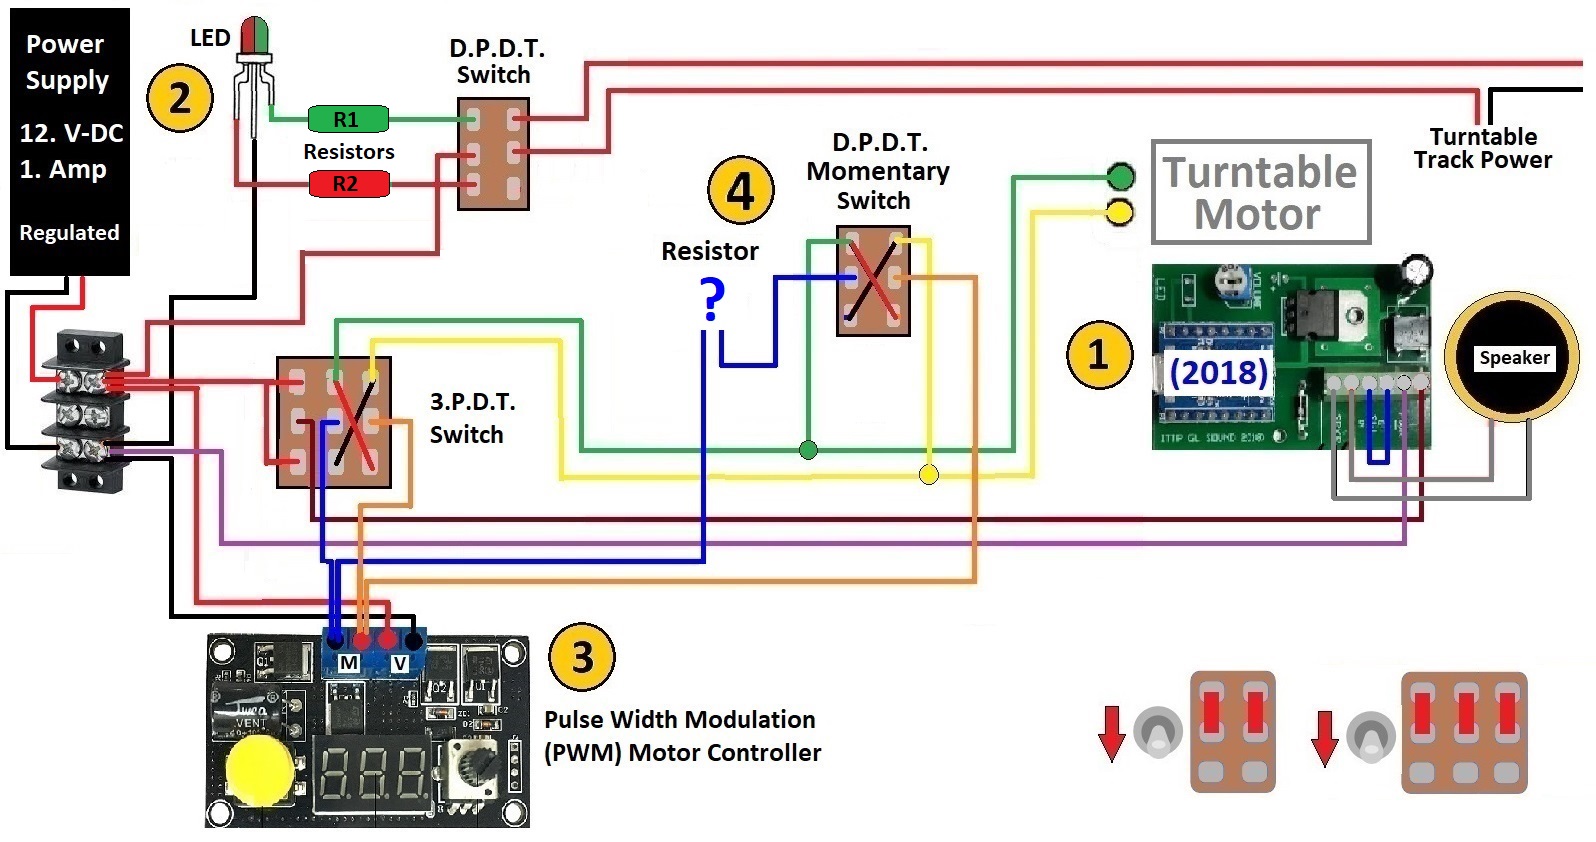
Projects (x4):
Project (#1)
* Require a (12.V-DC / 1.Amp) power supply for turntable motor, sound card, LED indicator and (PWM) motor controller
* Highly recommend using a "regulated" power supply used for "laptops" or "printers"
* Mini switch (3.P.D.T.) (center off) (on-off-on)
* Highly recommend using a high quality wire terminal to insure electrical contact
* The Euro type wire terminal does not bottom out flush insuring a good electrical contact

Project (#2)
* Especially for analog (V-DC) operations
* Turntable track power control switch with a LED indicator
* Mini switch (D.P.D.T.) (on-on)
* 5.MM diffused (largest viewing angle) (red & green) (3 pole) LED
* Required resistor to drop down the LED voltage
* Resistor (R1) = 470 Ohm, 1/2 Watt, 2%
* Resistor (R2) = 560 Ohm, 1/2 Watt, 2%

Project (#3)
* Have a turntable rotate slower using a pulse width modulation (PWM) motor controller
* Not a cheap regular motor speed controller
* This unit can be found on Ebay for around ($8.00)

Project (#4)
* Add a jog mode switch for even much slower turntable rotations for better indexing locations
* Mini switch (D.P.D.T.) (on-off-on) (momentary)
- OR -
* A toggle switch (D.P.D.T.) (on-off-on) (momentary) functions much easier
* (#4-A) A variable resistor (Rotary-Potentiometer) to control the jog turntable rotation
- OR -
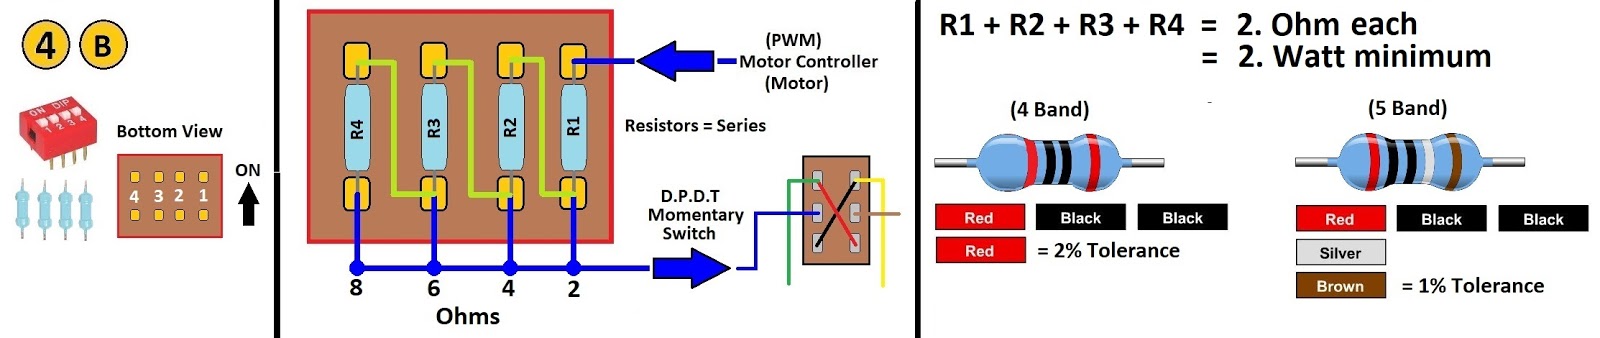
* (4-B) A circuit board (DIP) switches using (4) resistors.

Option: (#4A)
The lower required Ohms and the higher Wattage required (2 Watts) minimum, the required variable resistor (pot) is very hard to find.
- But -
(http://www.diamond-scale.com/products__motor_index_drive_systems.htm)
Voltage Limiting Potentiometer (MK-122) 250.Ohm / 3.Watt potentiometer.

Option: (#4B)
Use a (4) way circuit board (DIP) switches using the same (4) resistors.
* 12.V-DC --> 10.V-DC (1.Amp) = 2.Ohms / 2.Watts minimum
* Using (4) 2.Ohm / 2.Watt resistors connected in series.
Warning:
* Only (1) switch (#) can be "ON"
* The remaining (3) switch (#'s) must be "OFF"
* Based on a (12.V-DC) power supply from the (PWM) power supply
* Dip switch (#1) "ON" << RED = 10.V-DC output
* Dip switch (#2) "ON" << RED = 8.V-DC output
* Dip switch (#3) "ON" << RED = 6.V-DC output
* Dip switch (#4) "ON" << RED = 4.V-DC output
Direct e-mail contact only regarding my Blogs: gtrs.trains@gmail.com
Posted by Grand Trunk Railway Systems at Mar. 27 2018